E-KYC on GST Portal by Existing Taxpayers
On the GST portal, the GSTN has enabled AADHAAR Authentication/e-KYC for taxpayers. Though this verification is currently optional, taxpayers are encouraged to submit e KYC documents as soon as possible to obtain GST registration. In some cases, the signatories may not have an AADHAAR number to perform AADHAAR authentication, so, the government is providing taxpayers with the option of completing the GST e KYC verification authentication process.
In this post, we’ll go through the procedures that taxpayers may take to complete the e KYC authentication process for GST registration.
Process to Perform E-KYC on GST Portal by Existing Taxpayers
Step 1: Go to the GST portal and log in with valid credentials.
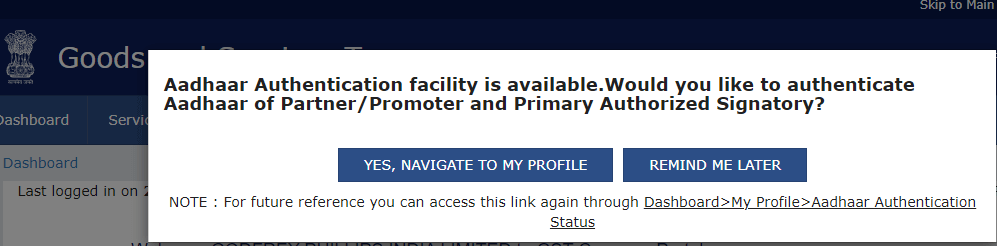
Step 2: A pop-up displays on the screen. ‘YES, NAVIGATE TO MY PROFILE’ should be selected here.
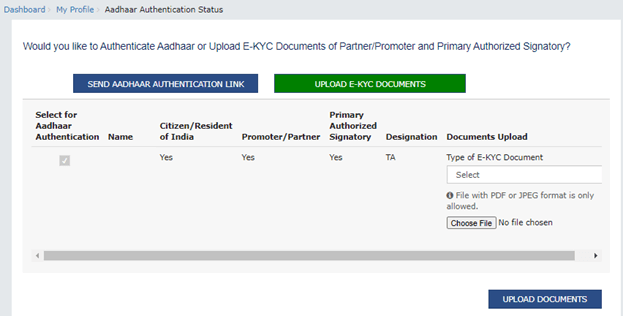
Step 3: The Taxpayer will be sent to the ‘My Profile’ page after clicking ‘YES, NAVIGATE TO MY PROFILE’. The ‘Aadhaar Authentication Status’ tab will be activated. The Taxpayer can ‘UPLOAD E-KYC DOCUMENTS’ by clicking on this tab.

Step 4: The tab’s color will change from blue to green, and the Promoter/Partner and Primary Authorized Signatory’s information will be shown.
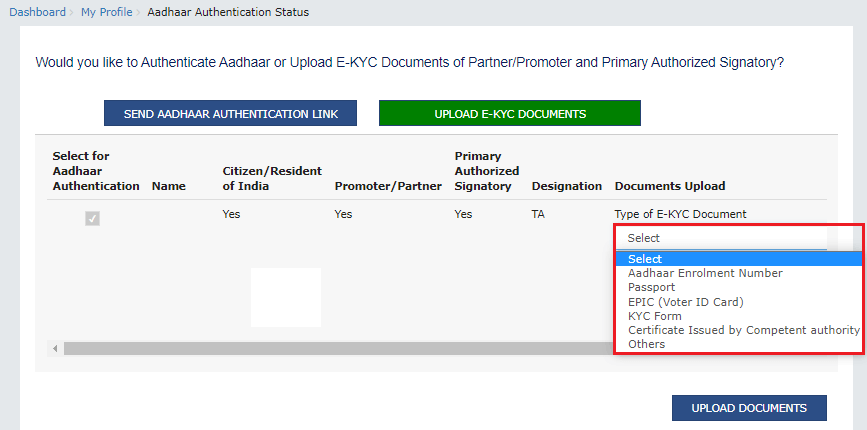
Choose the appropriate ‘Type of E-KYC Document’ from the drop-down menu. The following are the options:
- Passport
- AADHAAR Number
- Passport
- Know Your Customer (KYC) Form for GST Registration
- Other identifying certificates from a Competent Authority
Please note that only JPG and PDF file types are allowed.
Step 5: Select ‘UPLOAD DOCUMENTS’ from the drop-down menu.
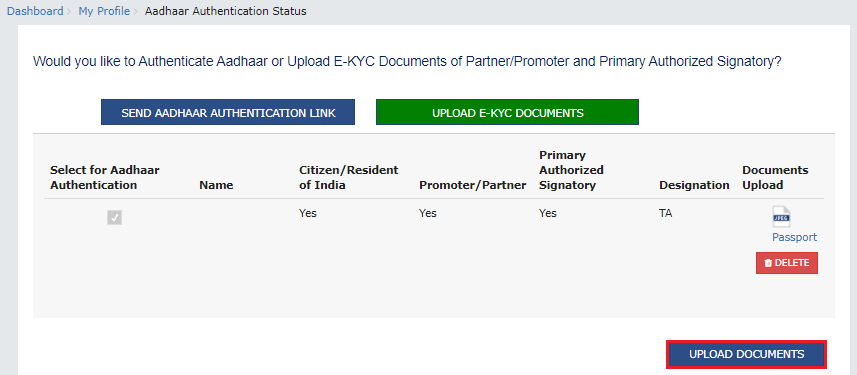
Step 6: A confirmation message appears after the upload is complete. Once done, you should select ‘OK.’

Different Scenarios after Uploading E-KYC Documents
An ARN is produced and shared with the Tax Official after the documents are uploaded. The documents submitted can be approved or rejected by the Tax Official.
1. Approval of E-KYC Documents
The taxpayer would be regarded as E-KYC Authenticated rather than AADHAAR Authenticated if the Tax Official approves the E-KYC documents for GST registration.
2. Rejection of E-KYC Documents
If the e-KYC form is rejected by the Tax Official, the Taxpayer will see the same pop-up every time he or she logs into the GST Portal, and the same procedure will have to be undertaken again. The taxpayer, on the other hand, will have two options: authenticate AADHAAR or upload E-KYC documents again.
3 Replies to “E-KYC on GST Portal by Existing Taxpayers”
Dear Sir / Madam,
Our GST portal upload E-KYC documents option is hide. What to do will enable
Dear Sir / Madam,
Our GST portal upload E-KYC documents option is hide. What to do will enable
Our GST portal upload E-KYC documents option is hide. What to do will enable