Manual for generating IRN on government portal
In order to generate the IRN i.e. Invoice reference number, follow the steps below:
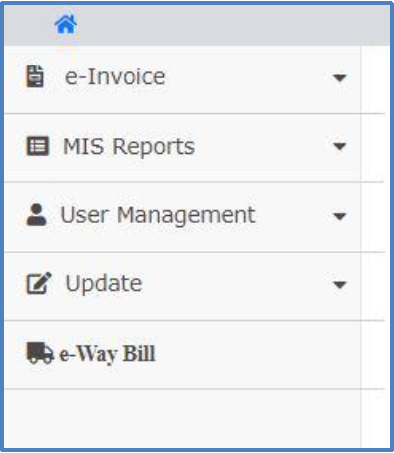
Step 1: Login into the E-Invoice portal with your registered username and password using the link – https://ewaybillgst.gov.in/login.aspx and go to the main menu of the e-invoice system.
Main menu consists of various options as shown below in figure –
Note:
Before you start this process of generating IRN, ensure you have the Invoice/Debit
Note/ Credit Note with you, as you will be requiring some details from these documents to be filled in the e-invoice entry form.
Step 2: Click ‘Generate New’ option under ‘e-invoice’ option, an ‘e-Invoice Entry Form’ will be opened (as shown in fig1) where you have to enter the invoice details.
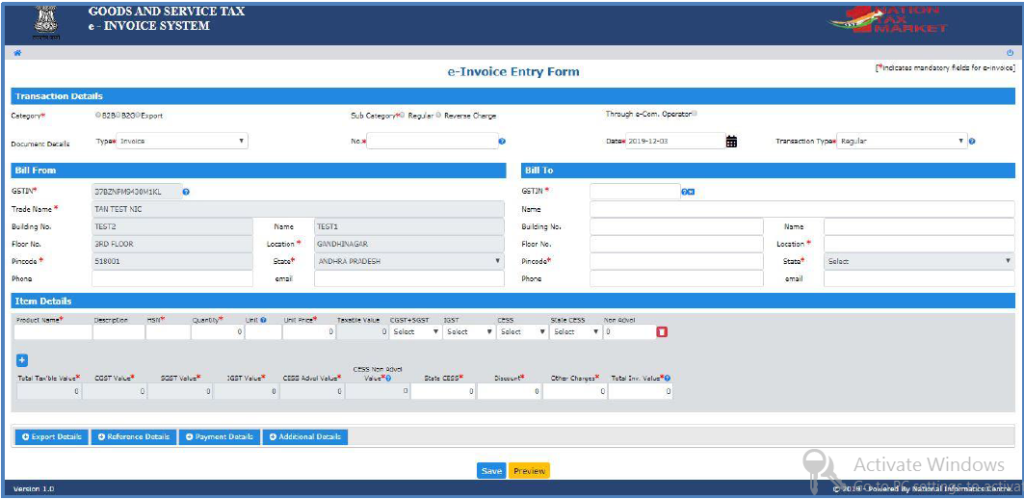
Step 3: There will be various sections in the e-Invoice entry form such as Transaction Details, Bill From, Bill To, Item Details, Export Details, Reference Details, Payment Details, Additional Details, as you can see in the Fig1.
Transaction Details section
Step 4: Select Category of the transaction from the three options given i.e. B2B, B2G or Export.
B2B, B2G and Export are explained below –
B2B (Business to Business) – Invoice is exchanged between a client and the provider of goods or services in the private sector. Such a transaction is known as B2B transaction.
B2G (Business to Government) – Businesses which sell products, services or information to Government or government agencies
Export – Export refers to those transactions in which goods are exported out of India.
Step 5: Now based on the above selection from categories, the below sub-category will be displayed to you:
If category type is B2B, there will be two sub-categories
- Regular
- Reverse Charge
If category type is B2G, there will be only one sub-category
- Regular
If category type is Export, there will be four sub-categories
- Direct
- Deemed
- SEZ
- SEZ Developer
| Case 1 | B2B | Regular | Invoice |
| Debit Note | |||
| Credit Note | |||
| Reverse Charge | Invoice | ||
| Debit Note | |||
| Credit Note | |||
| Case 2 | B2G | Regular | Invoice |
| Debit Note | |||
| Credit Note | |||
| Case 3 | Export | Direct | Invoice |
| Debit Note | |||
| Credit Note | |||
| Deemed | Invoice | ||
| Debit Note | |||
| Credit Note | |||
| SEZ | Invoice | ||
| Debit Note | |||
| Credit Note | |||
| SEZ developer | Invoice | ||
| Debit Note | |||
| Credit Note |
Step 6: Once you select the category and sub-category, relevant document types will be available in the ‘Document Type’ dropdown based on the chosen sub-category.
Step 7: As per the document available to you, select the type of document from the ‘type’ dropdown.
Step 8: Enter document no. in the ‘No.’ field as per the document available to you. Remember that for all invoice reference number generated, the document no. is unique.
Step 9: Select the date as mentioned in your available document. The document date should be less than or equal to the current date
Step 10: Select the transactions type from the dropdown containing options – Regular, Bill To” & “Ship To” and “Bill From” & “Dispatch From” and Combination of Both.
The transaction types are explained below –
Regular: This is very simple transaction where only two persons/parties are involved. That means, the movement of the consignment is done directly between Consignor and Consignee.
Bill To – Ship To: In this type, there is an involvement of three persons/parties/groups. Billing is done between consignor and consignee but on the request of the consignee, movement of goods is done to the third person/party.
Bill From – Dispatch From: Here also, three persons are involved in the transaction. Billing is done between consignor and consignee, but the movement of goods takes place from the third party to the consignee by the consignor
Combination of Both: This type of transaction consists of involvement of four parties, where billing is done same as the above three cases i.e. Between Consignor and Consignee but the movement of goods is done by the consignor from third person/party’s place to the fourth person/party on the request of Consignee.
Bill From section
Step 11: ‘Bill From’ details are auto-populated.
Bill To
Step 12: Enter “Bill To” details such as
a) GSTIN*
b) Name
c) Building No.
d) Floor No.
e) Location*
f) State* – Select from dropdown
g) Pincode*
h) Name
i) Phone no. and email
Item Details section
Step 13: In item details section, enter product details as per the invoice or document you are having such as Product Name, Product Description, HSN, Quantity, Unit, Unit Price. Details of tax rates will be automatically fetched from the Masters’ entry of products.
Step 14: While you enter the HSN, the standard tax rate percentage will be automatically populated in the dropdown. Select the tax rate slab percentage from the dropdown and on the bases of this, CGST, SGST, IGST and CESS value, etc will appear.
Step 15: In “CESS Non-Advol” and “Other Amount”(+/-), you have the choice to enter any ‘Other Charges’ or ‘Discounts’ applicable on the invoice in order to match the “Total Invoice value” to the Invoice value.
Total Invoice value is calculated and shown by the system.
Step 16: By clicking the plus button, you can add multiple products.
Note:
For intra-state movement, system displays CGST and SGST tax rate.
For inter-state movement, system displays IGST tax rate.
When the e-invoice entry form is filled completely, click the submit button. The system validates all the details filled in the form and generates a Invoice Reference Number (IRN) which is of 64 character length. QR code and digital signature will be added on the invoice by the system
Step 17:
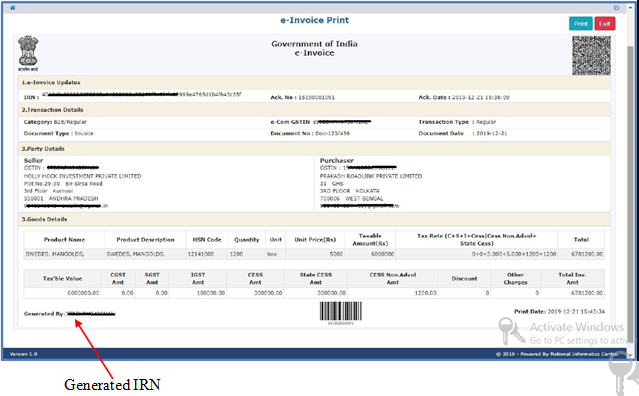
Step 18: You can also take print of this e-invoice containing generated IRN with the help of a blue-colored ‘Print‘ option on the top right corner of the page.