How to Reply to GST REG-03 Form?
The GST officer will review the applicant’s GST registration application Form GST REG-01. If the proper official wants further information, a document, or clarification during the inspection, the applicant will be in Form GST REG-03. The relevant officer must state the appropriate cause for disapproval on Form GST REG-03.
The provisions connected to Form GST REG-03 form and how to reply to GST REG-3 form are briefly explained in this blog.
The reason for the issue of GST REG-03
Every individual who wants to register for GST must fill out Form GST REG-01 and submit it online. The proper official would evaluate the application submitted. GST registration will be given to the applicant if the application filed is correct and approved by the GST officer.
The GST officer may issue a notification in Form GST REG-03 if the application filed is incomplete. This message will be sent to the applicant through email.
In a nutshell, the GST officer has the authority to issue a notification in Form GST REG-03 for any of the reasons listed below:
- When the proper official discovers that the applicant’s GST registration application contains any missing information or documents, or
- When the GST officer requests more information about the details provided in the GST registration application.
Other General Mistakes Made While Filing GST REG-01
- Inputting incorrect jurisdictional information
- Taking registration on the basis of a PAN that has been revoked
- Using a personal PAN rather than a corporate PAN
- A discrepancy between promoter information and their PAN data
- There is a discrepancy between the promoters’ information and the Director Identification Number (DIN) information in the MCA database.
- A discrepancy between the promoters’ information and the UIDAI (Aadhaar) database
- The company identification number is incorrect (CIN)
- Supporting papers are missing, inadequate, or out of date
- Errors while filling out the registration form due to human intervention
- Incorrect documents being attached
Time Limit to Issue GST REG-03 Form
The GST officer is obliged to issue a notice in Form GST REG-03 within 3 working days from the date of filing of an application, according to rule 9(2) of the CGST Rules, 2017.
A proviso has been added to rule 9(2) by notice number. 62/2020-Central Tax dated August 20, 2020. The proper officer can issue a notice in Form GST REG-03 within 21 days from the date of filing of an application under the following conditions, according to the newly included proviso:
Situation 1: The applicant fails to undertake AADHAAR authentication while completing a registration application in Form GST REG-01; or
Situation 2: When submitting a registration application in Form GST REG-01, the applicant does not select AADHAAR authentication.
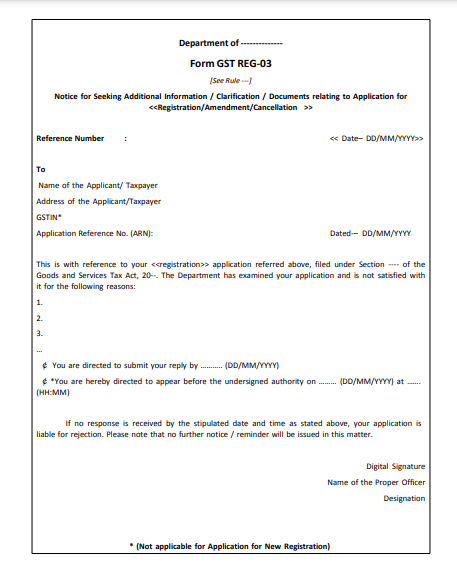
Format of GST REG-03 Form
What to Do After Receiving Notice in Form GST REG-03?
After receiving Form GST REG-03, take the following steps:
The applicant who has received a notification in Form GST REG-03 from the GST officer must provide any further explanation, information, or documents requested in the notice. Within 7 working days after receiving the notification, the reply must be filed in Form GST REG-04.
How to Reply to GST REG-03 Form?
Step 1: For new registrations, pick the ‘Temporary Reference Number (TRN)’ option from the ‘Register Now’ menu. Enter the TRN to continue. At a later point, the mobile/email OTP may be requested.
Step 2: Select ‘Application for Filing Clarifications’ from the Services > Registration menu.
Step 3: To file a reply to the GST REG-03 form, seek the notice using the Application Reference Number (ARN).
Step 4: In the event of a new registration application, the following procedures should be performed in order to reply to particular questions made by the department:
If ‘Yes’ is chosen under ‘Modification in the Registration Application Filed,’ the original registration application will be shown, with the opportunity to modify any fields for which a notification was given. You can make the necessary modifications and upload the required documents.
If ‘No’ is chosen, an application will be made accessible, along with a number of ‘Queries’ to which our ‘Query Response’ must be given.
Step 5: Submit any additional information as well as supporting documents.
Step 6: Complete the verification procedure by choosing the authorized signatory’s name and location from the drop-down list.
Step 7: To verify and submit the application you can either choose ‘Submit with DSC’ or ‘Submit with EVC’ from the authentication method available.